A Step-by-Step Guide on How to Center your Microscope Condenser
A compound light microscope focuses the light through a condenser beneath the microscope stage. Follow these steps to center your microscope condenser.
- Start with the Basics
- Ensure the microscope is on a stable surface.
- Use the 4x objective (lowest magnification) to start
- Make sure the condenser is raised up all the way (Click here for info on microscope condenser installation) - Locate the Centering Screws
- The microscope condenser will have two small screws on opposite sides, often built into the condenser holder (circled in red at right).
- These centering screws allow precise adjustment of the condenser's position - Close down the Field Diaphragm
- The field diaphragm is typically located at the base of the microscope (see red arrow at right).
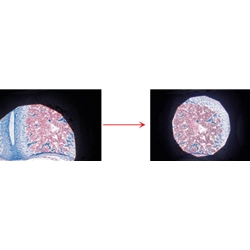
- Close the field diaphragm until you see a small polygon of light in the field of view. - Focus the Diaphragm Edge
- Use the condenser height adjustment to bring the edges of the field diaphragm into sharp focus.
- The diaphragm edge should appear as a crisp polygon (see image below). - Center the Diaphragm Image
- Use the condenser centering screws to move the diaphragm image to the center of your field of view.
- Adjust both screws in small increments until the polygon is perfectly centered. - Open the Field Diaphragm
- Once centered, open the field diaphragm until its edges disappear from view.
- This gives optimal illumination while reducing glare. - Check Higher Magnifications
- Move to a higher power objective and repeat the process if necessary.
- At 40x and above, precise condenser centering becomes increasingly important.

This image shows a properly centered microscope field diaphragm.