Surface roughness inspection and quality control are two important areas of manufacturing, especially in the automotive industry. Visible surface defects including cracks, bubbles, scratches and inclusions can restrict the function of a product. Additionally, these defects can lead to failure or cause complaints from customers, so they need to be caught early on in the manufacturing process. Surface defects could be a few millimeters in length to only a few micrometers. Part of quality control involves surface roughness inspection with the use of a microscope. Stereo microscopes and zoom microscopes are often used in these cases for industrial inspection. Surfaces with defects do not typically have a smooth surface and therefore darkfield illumination or ring light illumination can be helpful when using stereo or zoom microscopes.
In the drilling and machining process, the tool bits are exposed to constant wear and tear. Understanding the wear behavior of different drill bits can help when new materials need to be drilled. Microscopic analysis of the wear tracks can be performed using a zoom microscope to achieve the first overview of wear and tear on drill bits.

This image shows the tip of a drill bit captured under the Zeiss SmartZoom Digital Microscope using 40x magnification (segmented ring light, HDR, 1.6x objective).

This is the same drill bit captured under a scanning electron microscope (SEM). The scanning electron microscope is used to view very small wear marks.

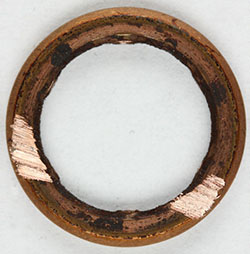
Sealing rings are used in automotive manufacturing. These sealing rings are exposed to force which can lead to deformations on the sealing surface. Quality control of these rings requires surface analysis and profile measurements.
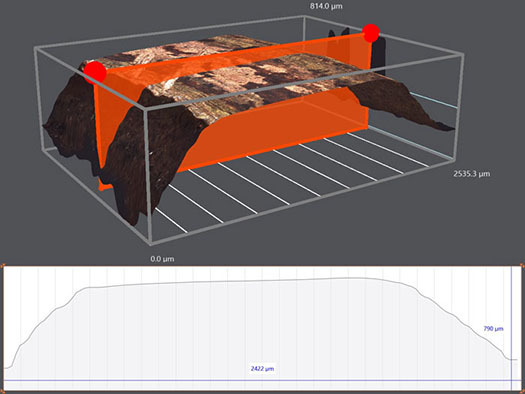
This is a seal ring that has some wear and tear on it. This ring was placed under the Zeiss SmartZoom Digital Microscope in order to quickly obtain a profile measurement on the sealing surface.
Below is the profile measurement of this seal ring captured under the digital zoom microscope.

There are multiple microscope options for quality control and surface roughness inspection, not only in the automotive industry but across manufacturing industries.
 Digital Zoom Microscopes
The Zeiss SmartZoom5 Digital Zoom Microscope is ideal for any type of sample surface inspection. It can be used to quickly obtain a profile measurement of surface roughness.
 Materials Metallurgical Microscopes
Metallurgical microscopes are used to provide high magnification (and high resolution) surface inspection of small parts including metals, plastics and opaque parts. The Zeiss Primotech is a compact materials microscope that can be combined with Matscope, a digital solution for surface inspection purposes.
 Stereo Microscopes
Stereo inspection microscopes are used for all industrial inspection tasks where lower magnification is required. Stereo microscopes are typically the first step in the inspection process and are used to identify potential problem areas.
If you have questions regarding a industrial inspection microscopes contact Microscope World and we will be happy to help.
